Como adicionar um sumário às suas postagens do Ghost
Informe aos seus leitores o que esperar em suas postagens e forneça links rápidos para navegar pelo conteúdo adicionando um sumário com a biblioteca Tocbot.

Introdução
Ter um sumário em seu site é um conforto agradável para os leitores de postagens - ter um que seja gerada automaticamente e esteja sempre atualizado é ótimo para os autores de postagens. Neste tutorial, mostraremos como adicionar um sumário gerado automaticamente ao seu site Ghost em alguns passos rápidos.
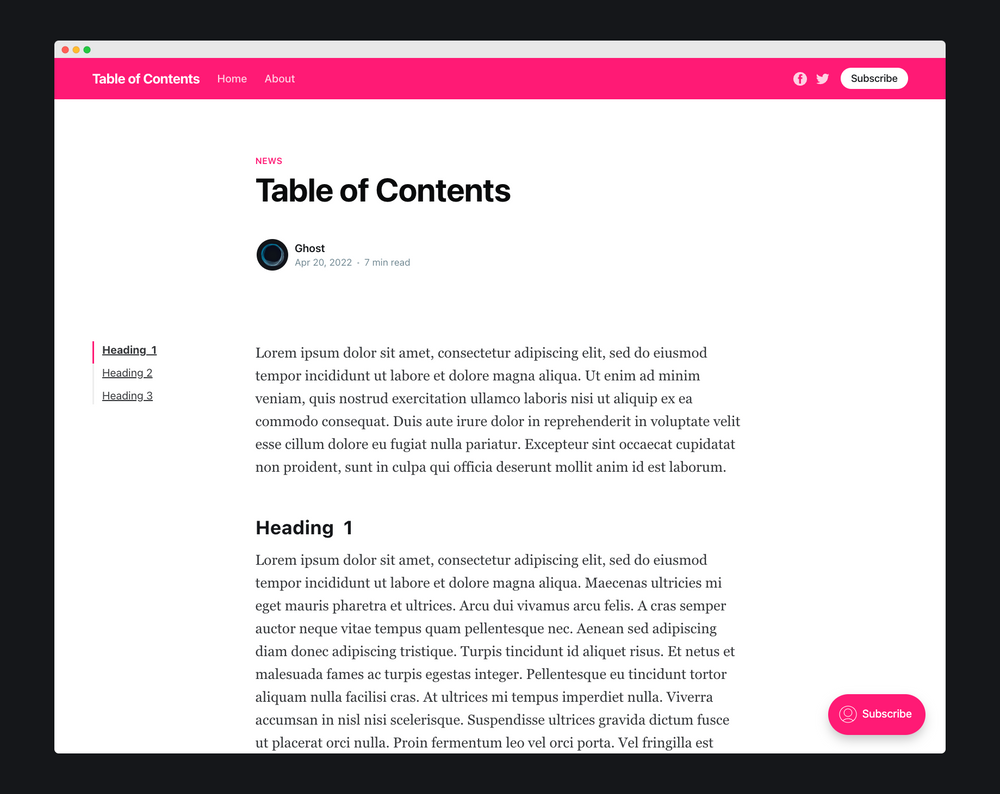
Aqui está um exemplo do que construiremos:
Tocbot
Para nos ajudar a adicionar o sumário, vamos usar uma biblioteca JavaScript (JS) chamada Tocbot. Essa biblioteca faz todo o trabalho pesado para nós, o que inclui encontrar os títulos da postagem, criar links para essas seções e mostrar ao leitor onde eles estão na página. É uma biblioteca muito legal!
Existem duas partes na biblioteca Tocbot: 1) um arquivo JS que lida com a funcionalidade e 2) um arquivo CSS que lida com o estilo básico. Ambos precisam ser carregados no seu tema Ghost.
Neste tutorial, estaremos usando o tema padrão do Ghost, o Casper. Embora os passos se apliquem a qualquer tema do Ghost, você precisará modificar o código para funcionar com o seu tema específico.
Edite o arquivo default.hbs
Abra o arquivodefault.hbsem um editor de código. Neste arquivo, adicione o script e os estilos do Tocbot conforme explicado abaixo.
Importe o CSS do Tocbot
Próximo ao topo do arquivodefault.hbs, dentro da tag head e logo antes de {{ghost_head}}, adicione o CSS do Tocbot:
<link rel="stylesheet" href="https://cdnjs.cloudflare.com/ajax/libs/tocbot/4.12.3/tocbot.css">Estilos adicionais
Vamos adicionar alguns estilos adicionais em uma tag style logo após o CSS que carregamos no arquivodefault.hbs.
Esses estilos ajudarão o Tocbot a se encaixar perfeitamente em nosso tema. Embora o que será compartilhado abaixo seja específico para o tema Casper, você pode adaptar o estilo para funcionar com o tema que estiver usando.
Nosso objetivo para o sumário é que ele esteja presente ao lado do conteúdo do artigo em telas maiores, mas acima dele em telas menores.
<style>
.gh-content {
    position: relative;
 }

.gh-toc > .toc-list {
    position: relative;
}

.toc-list {
    overflow: hidden;
    list-style: none;
}

@media (min-width: 1300px) {
     .gh-sidebar {
        position: absolute;
        top: 0;
        bottom: 0;
        margin-top: 4vmin;
        grid-column: wide-start / main-start; /* Place the TOC to the left of the content */
    }

    .gh-toc {
        position: sticky; /* On larger screens, TOC will stay in the same spot on the page */
        top: 4vmin;
    }
}

.gh-toc .is-active-link::before {
    background-color: var(--ghost-accent-color); /* Defines TOC   accent color based on Accent color set in Ghost Admin */
}
</style>
Adicione o JS do Tocbot
No arquivodefault.hbs, agora próximo ao final do arquivo e logo antes de {{ghost_foot}}, adicione o script do Tocbot:
<script src="https://cdnjs.cloudflare.com/ajax/libs/tocbot/4.12.3/tocbot.min.js"></script>Inicialize o script do Tocbot
Após ter carregado o script do Tocbot, agora precisamos inicializá-lo, informando ao Tocbot onde queremos que nosso sumário seja exibido na página e o que queremos adicionar a ele.
Adicione este script imediatamente após o código do último passo:
{{! Initialize Tocbot after you load the script }}
<script>
    tocbot.init({
        // Where to render the table of contents.
        tocSelector: '.gh-toc',
        // Where to grab the headings to build the table of contents.
        contentSelector: '.gh-content',
        // Which headings to grab inside of the contentSelector element.
        headingSelector: 'h1, h2, h3, h4',
        // Ensure correct positioning
        hasInnerContainers: true,
    });
</script>gh-content, gh-toc) usadas neste tutorial são baseadas no tema Casper. Você precisará alterar gh-content para corresponder à classe do contêiner (que envolve o conteúdo da sua postagem) do seu tema. gh-toc pode ser qualquer coisa que você desejar - você apenas precisa garantir que a classe no script de inicialização corresponda àquela no modelo (conforme mostrado no próximo passo).Edite o arquivo post.hbs
Vamos definir onde queremos que o sumário apareça em nosso tema.
No arquivo post.hbs, adicione o seguinte trecho de código imediatamente antes do auxiliar{{content}}:
<aside class="gh-sidebar"><div class="gh-toc"></div></aside> {{! The TOC will be inserted here }}Conclusão
Você fez um ótimo progresso: o Tocbot está instalado e você o configurou no seu tema do Ghost.
Como última verificação, seus arquivosdefault.hbs e post.hbsdevem estar assim:
- default.hbs
<!DOCTYPE html>
<html lang="{{@site.locale}}"{{#match @custom.color_scheme "Dark"}} class="dark-mode"{{else match @custom.color_scheme "Auto"}} class="auto-color"{{/match}}>
<head>
{{!-- Basic meta - advanced meta is output with {ghost_head} below --}}
<title>{{meta_title}}</title>
<meta charset="utf-8" />
<meta http-equiv="X-UA-Compatible" content="IE=edge" />
<meta name="HandheldFriendly" content="True" />
<meta name="viewport" content="width=device-width, initial-scale=1.0" />
{{!-- Theme assets - use the {asset} helper to reference styles & scripts,
this will take care of caching and cache-busting automatically --}}
<link rel="stylesheet" type="text/css" href="{{asset "built/screen.css"}}" />
{{!-- TOC styles --}}
<link rel="stylesheet" href="https://cdnjs.cloudflare.com/ajax/libs/tocbot/4.12.3/tocbot.css">
<style>
.gh-content {
position: relative;
}
.gh-toc > .toc-list {
position: relative;
}
.toc-list {
overflow: hidden;
list-style: none;
}
@media (min-width: 1300px) {
.gh-sidebar {
position: absolute;
top: 0;
bottom: 0;
margin-top: 4vmin;
grid-column: wide-start / main-start; /* Place the TOC to the left of the content */
}
.gh-toc {
position: sticky; /* On larger screens, TOC will stay in the same spot on the page */
top: 4vmin;
}
}
.gh-toc .is-active-link::before {
background-color: var(--ghost-accent-color); /* Defines TOC accent color based on Accent color set in Ghost Admin */
}
</style>
{{!-- This tag outputs all your advanced SEO meta, structured data, and other important settings,
it should always be the last tag before the closing head tag --}}
{{ghost_head}}
</head>
<body class="{{body_class}}{{#match @custom.title_font "=" "Elegant serif"}} has-serif-title{{/match}}{{#match @custom.body_font "=" "Modern sans-serif"}} has-sans-body{{/match}}{{#if @custom.show_publication_cover}} has-cover{{/if}}{{#is "home"}}{{#unless @custom.show_logo_in_navigation}} no-logo{{/unless}}{{/is}}">
<div class="viewport">
<header id="gh-head" class="gh-head outer">
<nav class="gh-head-inner inner">
<div class="gh-head-brand">
<a class="gh-head-logo{{#unless @site.logo}} no-image{{/unless}}" href="{{@site.url}}">
{{#if @site.logo}}
<img src="{{@site.logo}}" alt="{{@site.title}}" />
{{else}}
{{@site.title}}
{{/if}}
</a>
<a class="gh-burger" role="button">
<div class="gh-burger-box">
<div class="gh-burger-inner"></div>
</div>
</a>
</div>
<div class="gh-head-menu">
{{navigation}}
</div>
<div class="gh-head-actions">
<div class="gh-social">
{{#if @site.facebook}}
<a class="gh-social-link gh-social-facebook" href="{{facebook_url @site.facebook}}" title="Facebook" target="_blank" rel="noopener">{{> "icons/facebook"}}</a>
{{/if}}
{{#if @site.twitter}}
<a class="gh-social-link gh-social-twitter" href="{{twitter_url @site.twitter}}" title="Twitter" target="_blank" rel="noopener">{{> "icons/twitter"}}</a>
{{/if}}
</div>
{{#if @site.members_enabled}}
{{#unless @member}}
<a class="gh-head-button" href="#/portal/signup" data-portal="signup">Subscribe</a>
{{else}}
<a class="gh-head-button" href="#/portal/account" data-portal="account">Account</a>
{{/unless}}
{{/if}}
</div>
</nav>
</header>
<div class="site-content">
{{!-- All other templates get inserted here, index.hbs, post.hbs, etc --}}
{{{body}}}
</div>
{{!-- The global footer at the very bottom of the screen --}}
<footer class="site-footer outer">
<div class="inner">
<section class="copyright"><a href="{{@site.url}}">{{@site.title}}</a> © {{date format="YYYY"}}</section>
<nav class="site-footer-nav">
{{navigation type="secondary"}}
</nav>
<div><a href="https://ghost.org/" target="_blank" rel="noopener">Powered by Ghost</a></div>
</div>
</footer>
</div>
{{!-- /.viewport --}}
{{!-- Scripts - handle member signups, responsive videos, infinite scroll, floating headers, and galleries --}}
<script
src="https://code.jquery.com/jquery-3.5.1.min.js"
integrity="sha256-9/aliU8dGd2tb6OSsuzixeV4y/faTqgFtohetphbbj0="
crossorigin="anonymous">
</script>
<script src="{{asset "built/casper.js"}}"></script>
<script>
$(document).ready(function () {
// Mobile Menu Trigger
$('.gh-burger').click(function () {
$('body').toggleClass('gh-head-open');
});
// FitVids - Makes video embeds responsive
$(".gh-content").fitVids();
});
</script>
{{!-- Tocbot script --}}
<script src="https://cdnjs.cloudflare.com/ajax/libs/tocbot/4.12.3/tocbot.min.js"></script>
{{! Initialize Tocbot after you load the script }}
<script>
tocbot.init({
// Where to render the table of contents.
tocSelector: '.gh-toc',
// Where to grab the headings to build the table of contents.
contentSelector: '.gh-content',
// Which headings to grab inside of the contentSelector element.
headingSelector: 'h1, h2, h3, h4',
// Ensure correct positioning
hasInnerContainers: true,
});
</script>
{{!-- Ghost outputs required functional scripts with this tag - it should always be the last thing before the closing body tag --}}
{{ghost_foot}}
</body>
</html>- post.hbs
{{!< default}}
{{!-- The tag above means: insert everything in this file
into the {body} tag of the default.hbs template --}}
{{#post}}
{{!-- Everything inside the #post block pulls data from the post --}}
<main id="site-main" class="site-main">
<article class="article {{post_class}} {{#match @custom.post_image_style "Full"}}image-full{{else match @custom.post_image_style "=" "Small"}}image-small{{/match}}">
<header class="article-header gh-canvas">
<div class="article-tag post-card-tags">
{{#primary_tag}}
<span class="post-card-primary-tag">
<a href="{{url}}">{{name}}</a>
</span>
{{/primary_tag}}
{{#if featured}}
<span class="post-card-featured">{{> "icons/fire"}} Featured</span>
{{/if}}
</div>
<h1 class="article-title">{{title}}</h1>
{{#if custom_excerpt}}
<p class="article-excerpt">{{custom_excerpt}}</p>
{{/if}}
<div class="article-byline">
<section class="article-byline-content">
<ul class="author-list">
{{#foreach authors}}
<li class="author-list-item">
{{#if profile_image}}
<a href="{{url}}" class="author-avatar">
<img class="author-profile-image" src="{{img_url profile_image size="xs"}}" alt="{{name}}" />
</a>
{{else}}
<a href="{{url}}" class="author-avatar author-profile-image">{{> "icons/avatar"}}</a>
{{/if}}
</li>
{{/foreach}}
</ul>
<div class="article-byline-meta">
<h4 class="author-name">{{authors}}</h4>
<div class="byline-meta-content">
<time class="byline-meta-date" datetime="{{date format="YYYY-MM-DD"}}">{{date}}</time>
{{#if reading_time}}
<span class="byline-reading-time"><span class="bull">•</span> {{reading_time}}</span>
{{/if}}
</div>
</div>
</section>
</div>
{{#match @custom.post_image_style "!=" "Hidden"}}
{{#if feature_image}}
<figure class="article-image">
{{!-- This is a responsive image, it loads different sizes depending on device
https://medium.freecodecamp.org/a-guide-to-responsive-images-with-ready-to-use-templates-c400bd65c433 --}}
<img
srcset="{{img_url feature_image size="s"}} 300w,
{{img_url feature_image size="m"}} 600w,
{{img_url feature_image size="l"}} 1000w,
{{img_url feature_image size="xl"}} 2000w"
sizes="(min-width: 1400px) 1400px, 92vw"
src="{{img_url feature_image size="xl"}}"
alt="{{#if feature_image_alt}}{{feature_image_alt}}{{else}}{{title}}{{/if}}"
/>
{{#if feature_image_caption}}
<figcaption>{{feature_image_caption}}</figcaption>
{{/if}}
</figure>
{{/if}}
{{/match}}
</header>
<section class="gh-content gh-canvas">
<aside class="gh-sidebar"><div class="gh-toc"></div></aside> {{! The TOC will be inserted here }}
{{content}}
</section>
{{!--
<section class="article-comments gh-canvas">
If you want to embed comments, this is a good place to paste your code!
</section>
--}}
</article>
</main>
{{!-- A signup call to action is displayed here, unless viewed as a logged-in member --}}
{{#if @site.members_enabled}}
{{#unless @member}}
{{#if access}}
<section class="footer-cta outer">
<div class="inner">
{{#if @custom.email_signup_text}}<h2 class="footer-cta-title">{{@custom.email_signup_text}}</h2>{{/if}}
<a class="footer-cta-button" href="#/portal" data-portal>
<div class="footer-cta-input">Enter your email</div>
<span>Subscribe</span>
</a>
{{!-- ^ This looks like a form element, but it's just a link to Portal,
making the form validation and submission much simpler. --}}
</div>
</section>
{{/if}}
{{/unless}}
{{/if}}
{{!-- Read more links, just above the footer --}}
{{#if @custom.show_recent_posts_footer}}
{{!-- The {#get} helper below fetches some of the latest posts here
so that people have something else to read when they finish this one.
This query gets the latest 3 posts on the site, but adds a filter to
exclude the post we're currently on from being included. --}}
{{#get "posts" filter="id:-{{id}}" limit="3" as |more_posts|}}
{{#if more_posts}}
<aside class="read-more-wrap outer">
<div class="read-more inner">
{{#foreach more_posts}}
{{> "post-card"}}
{{/foreach}}
</div>
</aside>
{{/if}}
{{/get}}
{{/if}}
{{/post}}Agora você está pronto para enviar as suas alterações para o seu site do Ghost. Ative o seu novo tema, atualize uma postagem e observe o seu próprio robozinho do sumário fazer sua mágica 🤖
Referência
- Ghost Official Blog: How to add a table of contents to your Ghost site.